Posted on Leave a comment

How To Change Gutenberg Heading & Text Colors

Switching to Gutenberg block editor brings a lot of joy creating content. However, I still missing a lot of features from the classic editor, especially the ability to change text color, background color.

In this post, I’m going to show you how to change color of a particular section of heading or text block.

This is what I’m talking about:

Change text color in Gutenberg heading

Let’s get started.

Pick a color for your text

The first step is to pick a color for your text. If you want to use popular colors such as red, green, blue… you can skip this step.

However, if you want to be more precise, using a color picker is a must. I have tutorial on color picker here, please have a look.

Now, let’s say you have your favorite color, let’s move on to the next step.

Change a word, a phrase or a chunk of words’ color

To apply a color on a part of text of headings/paragraph, you need to enable the HTML editor function that is available on all Gutenberg text blocks.

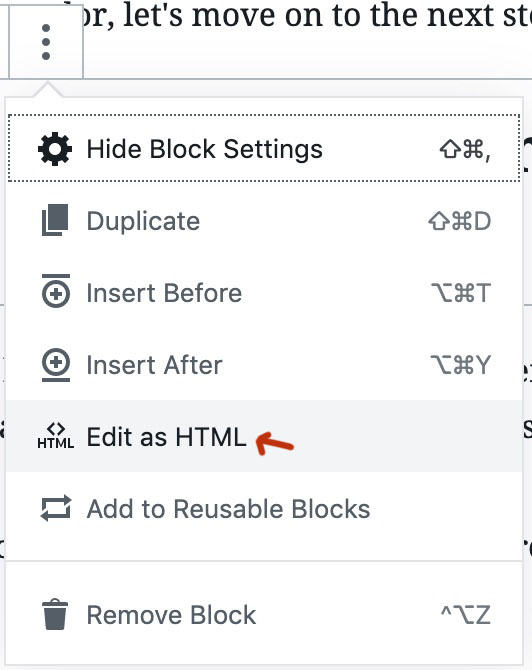
First of all, click on the block that you want to edit and click on the three vertical dots icon:

How To Change Gutenberg Heading & Text Colors 1

Then, click on Edit as HTML

How To Change Gutenberg Heading & Text Colors 2

Then, you block will turn into a HTML editor. This is where we are going to change the color for a chunk of text.

For example, I have the following text:

sample text block

As you may guess, we are going to apply the red color on RED and green on GREEN.

I’m going to use this red color: fc0328 and this green color: 03fc18

Here is how I’m going to achieve that:

How To Change Gutenberg Heading & Text Colors 3

And sure enough, we have the color as desired:

How To Change Gutenberg Heading & Text Colors 4

How it works?

The code looks confusing. However, if you look closely, it’s quite simple. To apply any color to any chunk of text, simply put this code at the start of that chunk:

<span style="color: #your_hex_color;">

And end that chunk with:

</span>

That’s all the mechanic required to change text color in Gutenberg.

Conclusion

Gutenberg is new and we should give it time to mature. In the meantime, accessing HTML editor is one of the best way to achieve some customization that is not available yet.

Posted on Leave a comment

How To Fix “The site is experiencing technical difficulties” In WordPress

After installing a plugin/theme or changing something in your WordPress site, you see this message:

The site is experiencing technical difficulties in WordPress

That means your site is having some problem with PHP and it stopped functioning. Is this problem serious? Yes, it is. If you are lucky, only part(s) of your site is having that problem. Otherwise, the whole site is down.

How to fix “The site is experiencing technical difficulties”

As I mentioned above, the problem is caused by errors in PHP, and PHP errors can be anything. It maybe some syntax errors, version incompatibility…

If you have WP_DEBUG enabled, you should see additional details of the error:

detailed error message provided by wordpress

As you can see in this picture, a syntax error is the culprit. At this point, if you know PHP, you can go to that file and fix the syntax.

If you just see “The site is experiencing technical difficulties. Then, please check your site admin email inbox for instructions.” Chances are you don’t have WP_DEBUG enabled. Let’s enable that setting in the next section.

How to enable WP_DEBUG and read the error

Enabling WP_DEBUG is easy. Let’s go to the root folder of your website and find the file wp-config.php. Open it with a text editor, scroll down to the bottom of that file till you find this line:

/* That's all, stop editing! Happy publishing. */

You should see this line:

define( 'WP_DEBUG', false);

Change it (or add the following line if you don’t see it) to this:

define( 'WP_DEBUG', true);

Add two more line below that line:

define( 'WP_DEBUG_LOG', true);
define( 'WP_DEBUG_DISPLAY', true );

Save the file and reload your site.

This time, you should see the detailed message along with “The site is experiencing technical difficulties.”.

If you know how to fix that, it’s great. Otherwise, you should ask someone who knows PHP to fix that for you.

I can also give you assistance if you need it.

After fixing the problem, you should revert the configuration in wp-config.php back to its original (all constants WP_DEBUG, WP_DEBUG_LOG, WP_DEBUG_DISPLAY should be false).

Conclusion

When you see “The site is experiencing technical difficulties.”, your site is having problems with PHP, which could be very serious. The first step is to turn debug on to see what’s the cause. Then, either go fix it yourself or send the error message to someone with experience.

Posted on 2 Comments

How To Exclude Tags, Categories From Google Index

How To Exclude Tags, Categories From Google Index 5

One of the most serious SEO problem is duplicate content. That is having the same content on different URLs. Google doesn’t like this for one obvious reason: no one like reading the same content over and over again.

What is a tag/category page?

In case you don’t know tag and category pages are, they are the pages that list all posts in the same category or share the same tag.

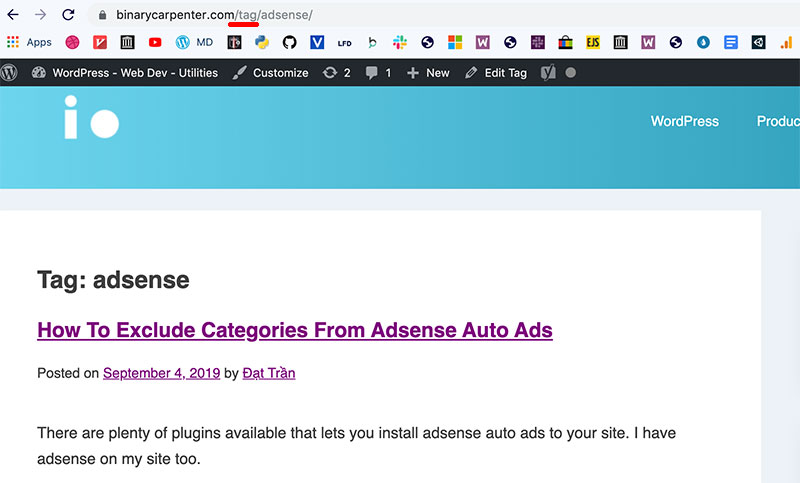
Here is one example of tag page:

How To Exclude Tags, Categories From Google Index 6

If you format your URL based on name, you should see /tag/ in the URL. The same thing can be seen with category.

Letting Google index your category and tag pages is way more serious than duplicate content. In my own observation on my site, category and tag pages usually rank higher than the posts. That means you spend hours optimize your posts to meet all SEO requirements and they will end up no where (because your tag/category pages rank higher).

That’s why you need to mark tag and category pages as noindex to avoid this problem.

How to mark tag and category pages as noindex?

To stop Google from indexing your tag/category pages, you need to let it know by adding a noindex meta tag to such pages. If you don’t know much about coding, no worries. There is no coding required.

To accomplish this, I assume that you have Yoast SEO plugin installed. Let’s begin.

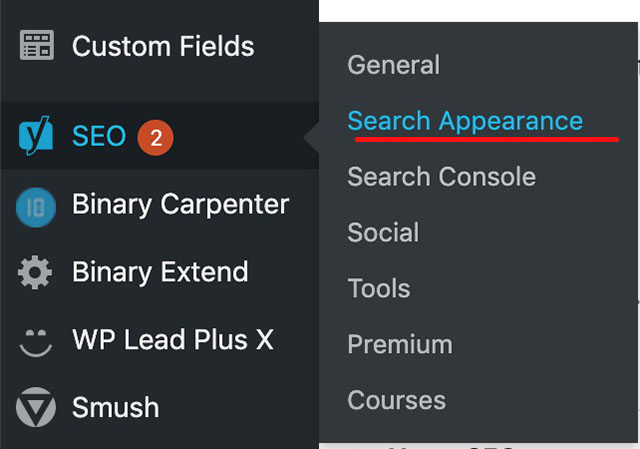
First, go to SEO->Search Appearance

How To Exclude Tags, Categories From Google Index 7

Let’s click on Taxonomies:

How To Exclude Tags, Categories From Google Index 8

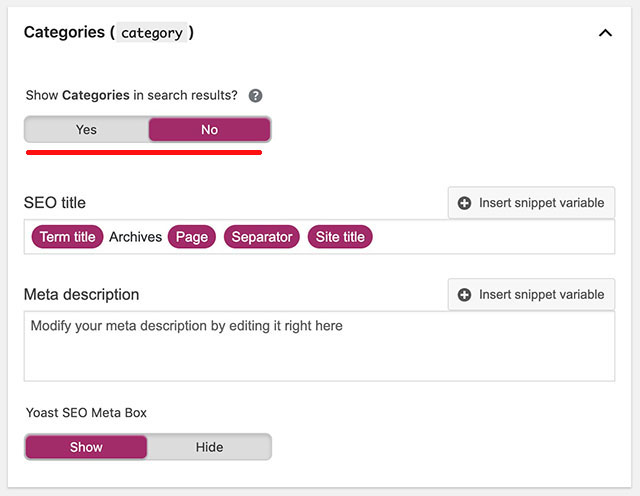
Now, under that tab, you’ll see these sections:

How To Exclude Tags, Categories From Google Index 9
How To Exclude Tags, Categories From Google Index 10

If you don’t see the content of such sections, click on the title to show.

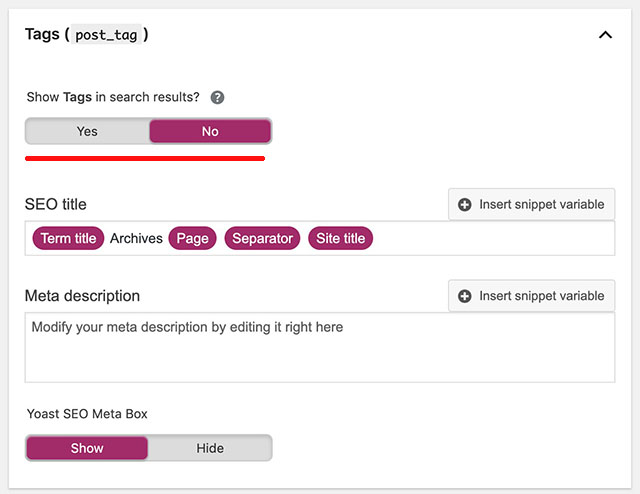
Let’s look at the settings that I underlined with red. If you select Yes, the tag/category pages are indexed by Google. If you select No, a noindex meta tag is added to all tag/category pages. As a result, Google will not index those pages.

If your tag/category pages are already in Google’s index, don’t worry. Google bot will remove them the next time it crawls your site.

If you take a look at the page source now, there is a noindex meta tag there:

How To Exclude Tags, Categories From Google Index 11

Conclusion

This subtle change can have a huge impact on your goals (sales, ads click…) since your reader will see the more targeted pages instead of category/tag pages. Also, it may also help you improve your search result click through rate because the title of a single post is always more optimized than that of category/tag pages.

Posted on Leave a comment

How To Exclude Categories From Adsense Auto Ads

There are plenty of plugins available that lets you install adsense auto ads to your site. I have adsense on my site too.

Initially, my method is to inject the ads code to the head of my site. It works. However, since now I have WooCommerce plugins to sell, I want to disable ads on post categories that related to WooCommerce (Because I have ads for my products there).

Also, I have a custom post type (which is the sales page of my products) that I want to exclude from displaying ads too.

I searched for a plugin that does just that but no avail (After 10 minutes searching on Google. I’m impatient, I know). So, I decided to make one that does the job for me.

Meet the WordPress plugins that let you enter ads with options to exclude form categories/custom post types

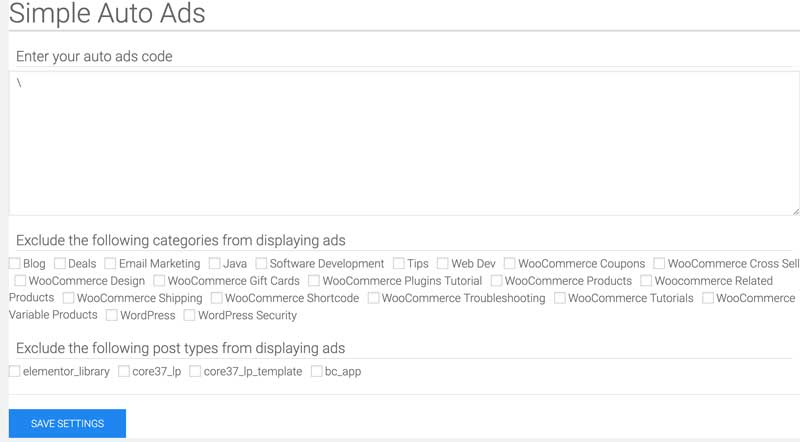
So, here is what I created:

How To Exclude Categories From Adsense Auto Ads 12

You can download the plugin here:

As you can see, the interface is quite busy. However, there are three main sections:

  1. A textarea where you can enter your auto ads code from Google Adsense
  2. Next is the list of categories on your site. If you want to exclude a certain category, simply select it
  3. Finally, here are the list of custom post types on your site. I have 4 custom post types on my site. You may have more or less. Check the types that you don’t want to show ads

Now you may ask, how can you exclude ads from WooCommerce product pages? Well, if you have WooCommerce installed, in the list of custom post types, you’ll see one option named “product”. Check that box if you want to exclude WooCommerce from showing ads.

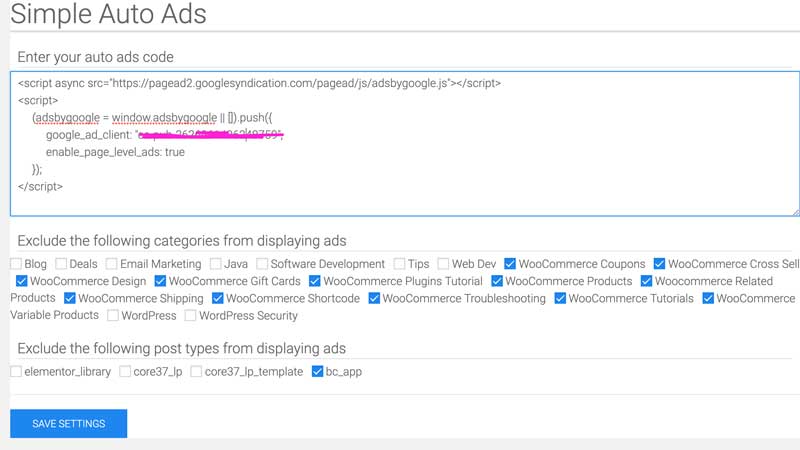
Here is my configuration:

How To Exclude Categories From Adsense Auto Ads 13

As you can see, I excluded all categories related to WooCommerce and one custom post type called bc_app. This is the pages where I sell my plugins.

Conclusion

Hopefully the plugin is useful to you. If you have any suggestions or feature requests, simply comment below.

Posted on Leave a comment

How To Exclude Custom Post Types, Posts, Pages From Yoast SEO Sitemap

How To Exclude Custom Post Types, Posts, Pages From Yoast SEO Sitemap 14

If you want to exclude certain custom post types to the sitemap that generated by Yoast SEO plugin, you are at the right place. In this short post, I’m going to show you exactly how to do that.

Requirements

The only requirement is you need to install my plugin. This is the one I made to solve my own problem. As you can see, I created a plugin called WP Lead Plus X that generates landing pages. It created two custom post types to handle the template files.

I don’t want include those files in the sitemap since they have short content and usually don’t reflect the topic of my main website.

Download the plugin to exclude custom post types from Yoast SEO sitemap below

How to configure what post types to exclude from Yoast SEO site map

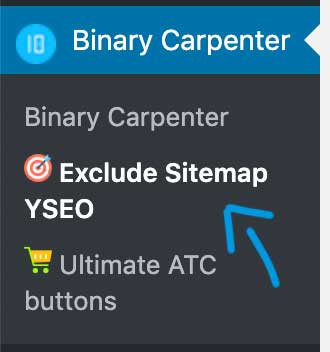
Now I assume that you have installed and activated the plugin. In your dashboard, you’ll see it appears under Binary Carpenter:

How To Exclude Custom Post Types, Posts, Pages From Yoast SEO Sitemap 15

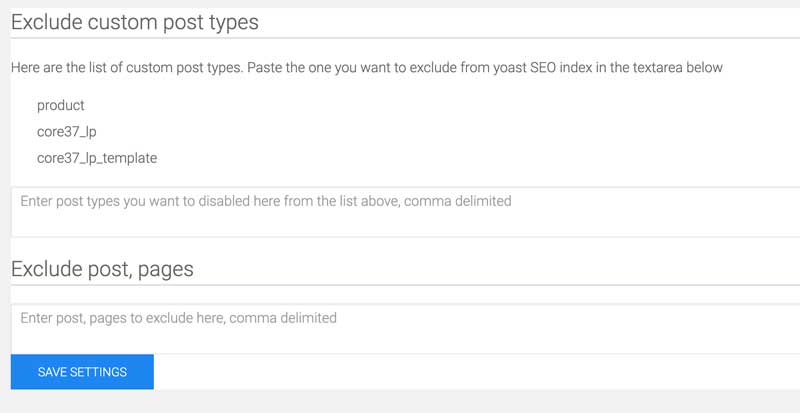
Click on that, you’ll find a very simple interface:

How To Exclude Custom Post Types, Posts, Pages From Yoast SEO Sitemap 16

As you can see, the plugin lists the custom post types available on your site as an unordered list. In my example, I have three custom post types:

  • product
  • core37_lp
  • core37_lp_template

Now, for example, I want to exclude core37_lp and core37_lp_template post types from the sitemap. I’ll enter them into the textarea box below, comma delimited:

How To Exclude Custom Post Types, Posts, Pages From Yoast SEO Sitemap 17

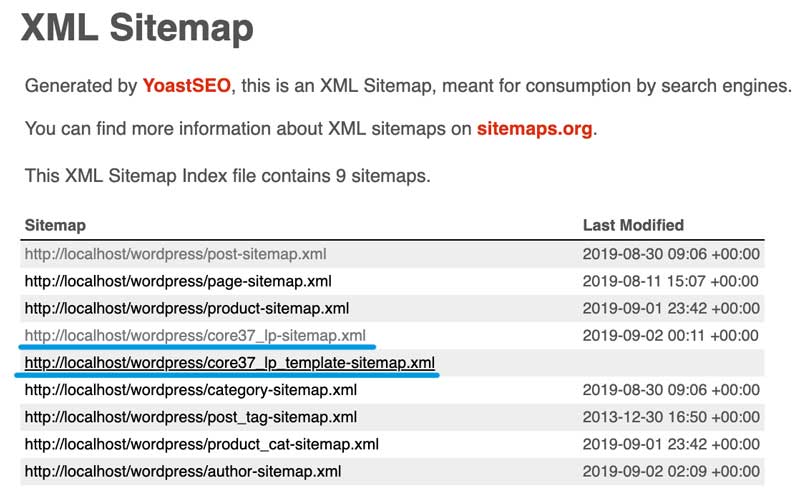
Before clicking on the save settings button, let me show you my current sitemap:

How To Exclude Custom Post Types, Posts, Pages From Yoast SEO Sitemap 18

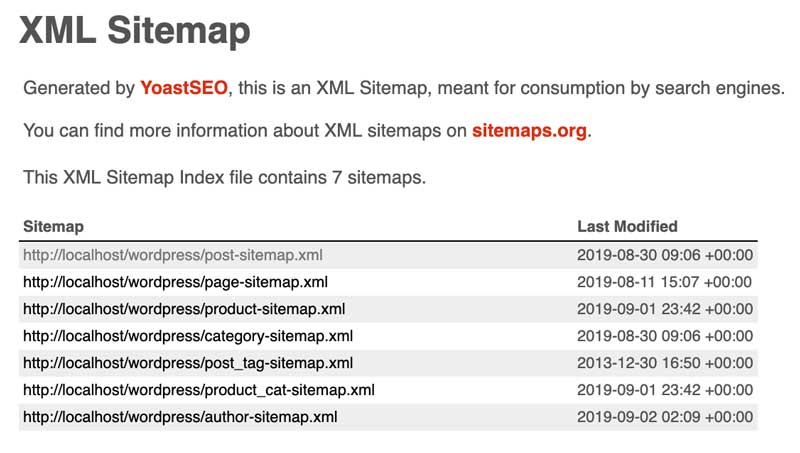
As you can see, my custom post types are showing in the sitemap. Let me save changes and reload the sitemap again:

How To Exclude Custom Post Types, Posts, Pages From Yoast SEO Sitemap 19

As you can see, the new sitemap doesn’t have the custom post types that I excluded.

Bonus feature

As you can also see in the plugin, you have the ability to exclude certain pages/posts from the sitemap. Simply enter their IDs as comma separated list and they’ll be exclude from your Yoast SEO sitemap.

Conclusion

I hope this plugin is useful to you. Note that it works with Yoast SEO sitemap only.