
Contents
Contact form 7 is a great plugin to build contact form for WordPress. In contrast to its super powerful functions, the look at feel of this form builder has been very basic through the years.
One of the most needed feature is to layout the contact form in multiple columns. This feature is available in many form builders. However, we still haven’t seen any sign of it get added to contact form 7.
If you need to layout your form in multiple columns, don’t worry, I got your back.
I will show you how to layout contact form 7 fields in as many columns as you like (well, may not as many as you want but sufficient for all your needs).
Let’s get started.
Step 1: install plugin to enable grid system on your site
We are going to install a plugin which I’ve made a few minutes ago to enable multiple columns layout on your site. My plugin uses a CSS framework called skeleton CSS to let you layout elements on multiple columns.
You are not limited to use this for laying out contact form 7 elements. You can use this for many other things you need.
Let’s download and install my plugin here:
https://www.dropbox.com/s/685l4umn4pi5k6v/super-simple-grid.zip?dl=0
Install and activate it then you are done. There isn’t anything to configure with my plugin. Isn’t that great 😉
Step 2: Putting contact form 7 elements to columns
Before we actually begin putting contact form 7 elements, I would like to introduce you to our grid system.
There are three elements of our system:
- Container (this is the outer most element)
- Row (represents a row)
- Column (represent a column)

If you now HTML/CSS, this diagram is not strange to you.
Now, let’s create a simple form in contact form 7.
I’m not going to show you how to create a form since it’s very easy to do so. You’d probably know how to do that already.
This is my form code:
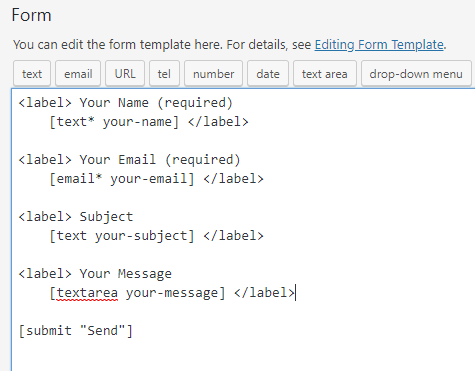
I’ll take the shortcode and put on a contact page. This is what I have:
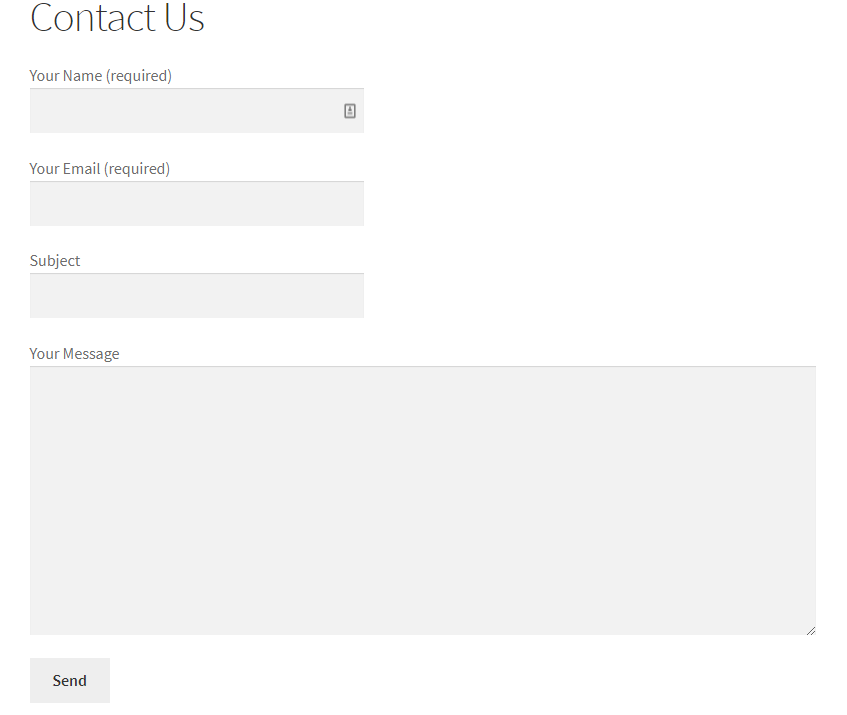
You can see that, everything is in one column.
What if I want to put the email field to the right of the name field?
It is super simple. I’m going to:
- Add a container div that wrap the form
- Add a row at the top and inside that row, add two columns
- One column hosts the name field, the other hosts the email field
- I add another row. Inside that row, add one column that spans the whole row.
- Then, I put the rest of the form in that row
Here is the code:
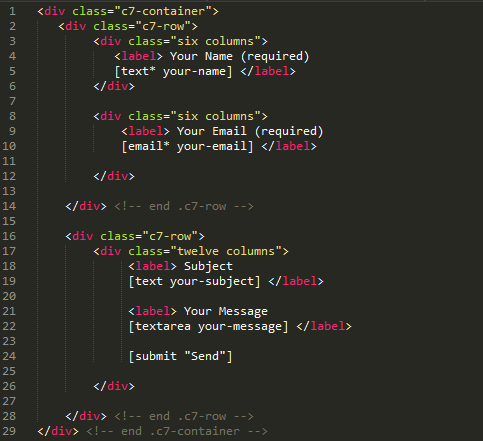
The grid system is based on 12 columns layout. So, in the first row (.c7-row), you see that I have two columns, each spans six columns so they will occupy equal amount of space.
On the second row, I put everything in one column that span 12 columns. You can see that the class is twelve columns.
Now, save the form and let’s see the result:

Not surprisingly, we have the two fields: name and email laid out in a single row.
Conclusion
As you can see, it’s very simple to create a contact form 7 form that has multiple columns. Hope you now can create better contact form for your site.
If you have question, please ask. I’d love to hear your feedback.