Contents
Are you a complete WordPress beginner? If so, this WordPress For Beginners post is for you. After completing this post, you’ll have what it takes to create awesome WordPress sites right away.
WordPress is an awesome platform for creating all kind of sites. It started as a blogging platform. However, nowadays, people use WordPress for all sorts of purposes. I use WordPress for blogging, selling products and even building web API. If you are a complete beginner to WordPress, this post is for you. It will be long since I’ll try to cover every important parts in WordPress. However, to make it easy for you to read and understand, I will break the content down to atomic pieces so you can quickly grasp a new WordPress concept.
Let’s get started
WordPress.org and WordPress.com
As a beginner, you may be confused these two sites together. They are owned by Automattic, the company that develop WordPress. However, on WordPress.org, you will download a piece of software and install on your own domain to create your site. If you go to WordPress.com, you can create a blog to start writing away without any setup. Let’s compare these two sites to see their pros and cons:
WordPress.com
PROS
- You can create a free blog that ends with .wordpress.com
- It’s completely free
- There is no setup, the site is done for you.
CONS
- You don’t have much control over the site
- The site is owned by WordPress.com so you cannot install plugins, themes, edit files
- The storage is limited to just 3GB.
- You cannot use WooCommerce to sell products
WordPress.org
PROS
- It’s completely free
- You have full control over your site
- Since you are in complete control, you can install themes, plugins, edit files
- You own your own domain
CONS
- You have to install it on your own server. That means, you must buy hosting and domain. This part is easy though.
So, as you can see, each choice has its own pros and cons. If you just want to create a free blog and write content, go with the first option. However, if you are serious about your business (even blogging business), by all means go with option 2 (buy domain, hosting and install WordPress download from WordPress.org).
In this post, we are going to talk about the version that you install on your own server.
Next, we will find out how you can add content to your site via pages and posts and how to customize your site’s look and feel using themes and plugin.
Getting familiar with the admin panel
After creating your site, you usually go to yoursite.com/wp-admin to access the admin panel of your site. This is the place you do all the managing tasks from creating, deleting content, adjusting site appearance, install, remove plugins…
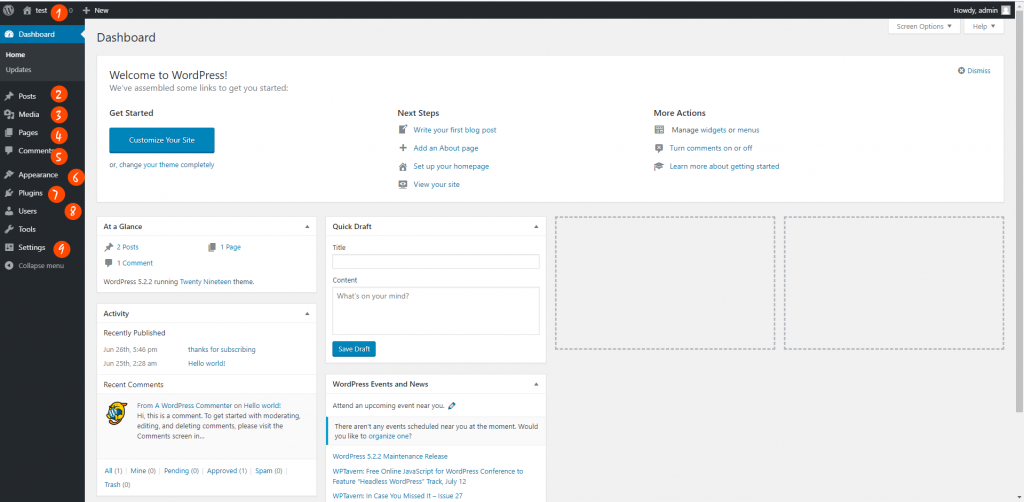
Here are the most important sections places in this admin panel you need to pay attention to. Each section has its own sub sections to provide you maximum flexibility when working with WordPress.
- You can view your site clicking on this section
- Click here to manage your posts. You can create, edit, delete your posts here.
- Media is where you manage files, images, videos.
- Create your pages here. Similar to the posts section, you can add, remove and edit pages here
- Comments is the section where you manage comments on your site. When you add content to your site, if you enable the comment functionality, then people visit your site can leave a comment to share their opinions.
- Appearance is the place you manage your themes. Theme determine how your site look so it is very important. In WordPress, there are many free and good themes for your to select from. If you want to use more advanced designed, you may need to buy and install premium themes.
- Plugins are the software that created to extend the functionalities of your WordPress website. In this section, you can add, remove plugins with just a few clicks. WordPress has a free plugin repository that contains many good plugins. However, similar to themes, you may need to buy premium plugins to achieve some specific features.
- Users are where you can update your name, your password, your email… If you are the administrator, you can add and delete other users on your site.
- Settings is where you can set many important options for your site such as site’s title, site’s description, permalink structure (the way your URL display).
Creating content with posts and pages
Post is the most common type of content on any website. In WordPress, everything is a post. A page is a post, a product (WooCommerce) is also a post (it is called a custom post).
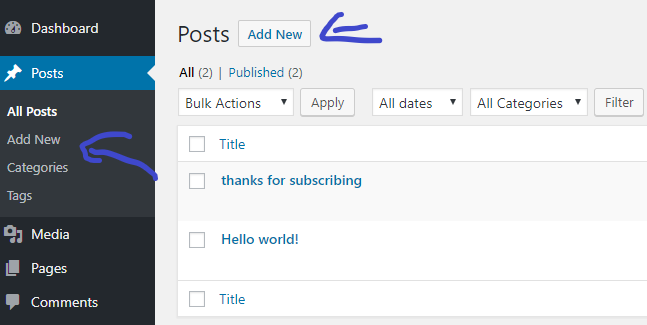
To create a post, simply click on Posts. You’ll see the menu on the left of the admin panel expand:
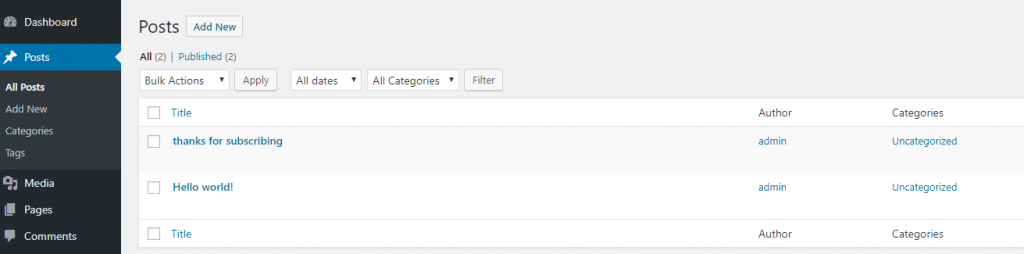
As you can see, under Posts there are some new items:
- All posts: Show all posts on your site
- Add new: Add a new post
- Categories: Manage posts categories. You can divide posts in to as many categories as you like. For example, you write about phones so you can have two categories: iPhone and Android. Your categories may also have child categories. For example, under Android, you may have: Samsung phones, HTC phones, Google phones…
- Tags: Tags are similar to categories. They are another way to group posts together. For example, if you write one post about HTC phones, another for Samsung phones, you can add the tag “android phone” for these two posts. There are no limit on how many tags you can have per post.
After click on Add new, you’ll see this:
If you don’t see an interface like above, don’t freak out. You’d probably see something like this:
Why there are two editors? Why is this confusion? You may ask. The answer is from WordPress version 5, the new editor (named Gutenberg) is the default editor. Before that, WordPress used the classic editor. If you like working with the classic editor, you can install this plugin to disable Gutenberg.
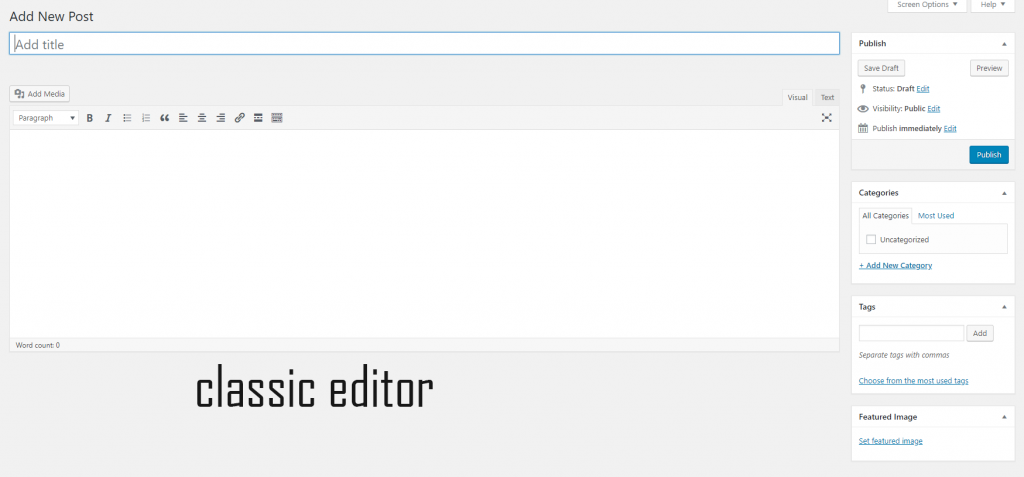
How to create new post with the classic editor
Creating a post with the classic editor is super easy. You just enter the post title, post content then hit the publish button and your content is live. The post will have an URL (similar to an address) that you can send to other people to read your content. Let’s inspect the classic editor to see the most important sections:

As you can see from the picture, there are 7 important areas when creating posts with the classic editor:
- Post title: This is the title of your post. It should not be blank (though you can leave it blank and publish)
- Post content: This is where you put the content of the post in. Think about an article you have just read. The article content should be written in this section
- Categories: Here you can select categories for the post. As mentioned earlier, one post can have more than one category. The default category is “Uncategorized”. However, you can create new categories and set them to the new post
- Add tags: tags are important parts of your post since it’s a way to group posts that share topics together. Unlike categories that must be pre-defined, you can enter whatever you like.
- Preview post: After creating the content, you can hit the Preview button to see how it looks like on the website.
- Save draft: If you are not ready to publish yet, you can save the post as a draft and continue to work on the post later. A draft post can be seen only by the editor/author/administrator (sounds confusing? These are the roles of users in WordPress). People who don’t have access to the admin panel don’t know this post exists, even search engines.
- Publish: When you are ready to present your post to the world, press this button.
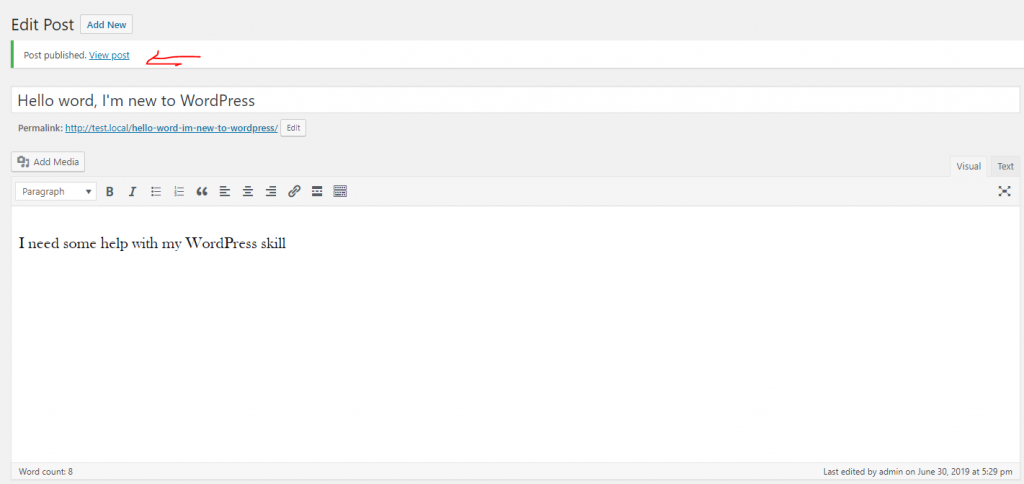
Now you can click on “View post” link to view your post.
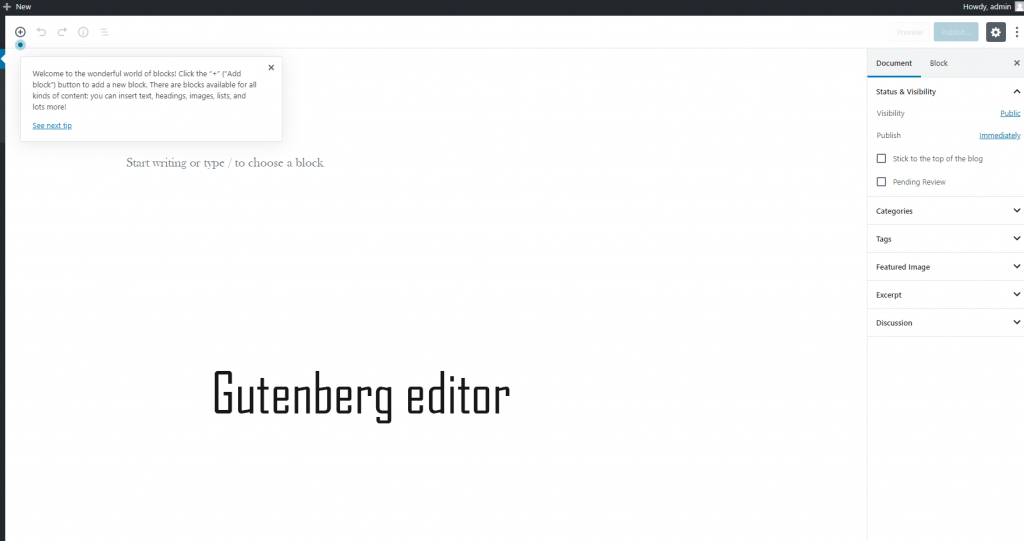
Creating your post in Gutenberg editor
Gutenberg is the new WordPress editor that has made default from version 5. There is a fact that not many people like it. If you look at the Gutenberg plugin on WordPress.org, you’ll see it has very low rating.
The reason partly because of people are used to the classic editor and at the beginning, Gutenberg was buggy (it still has some bugs but I saw great improvements since the first version).
Gutenberg is known as the “Block Editor”. Let me show you what it has that name:
As you can see how Gutenberg is different from the classic editor. Instead of entering all content in a giant box, now, you add “blocks of content” to the post by clicking on the (+) sign. For me personally, I prefer to work with the traditional classic editor since it’s simpler. However, Gutenberg editor has some advantages that the classic editor can only dream of:
- With Gutenberg, users can have columns. Meanwhile, in classic editor, you write content in one column
- You can insert various elements, including buttons. In the classic editor, if you don’t know HTML, it is hard to create such elements in post
- Adding more custom blocks is another strength of Gutenberg editor. You can add more blocks to the editor if you know code. If you don’t, there are plugins available that let you insert all kinds of elements to the post. You can think of Gutenberg is the new page builder such as Elementor, Visual composer…
WordPress Pages vs Posts
As I mentioned earlier, page is a type of post. However, pages are designed to be good for static content (content that don’t change or need update). Usually, you would use a page to create contact us page, about page…
Unlike posts, pages don’t have categories.
Change your site's appearance with themes
Now you’ve known how to create pages and posts. It’s time to style your site to match your taste.
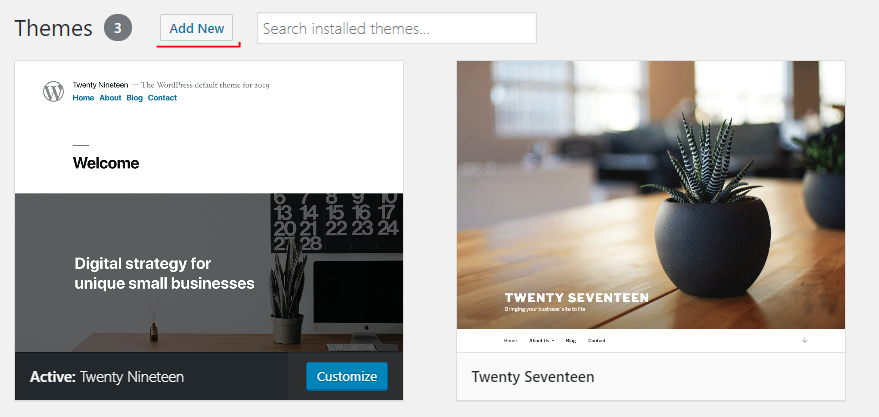
To manage your themes, go to Appearance-> Themes
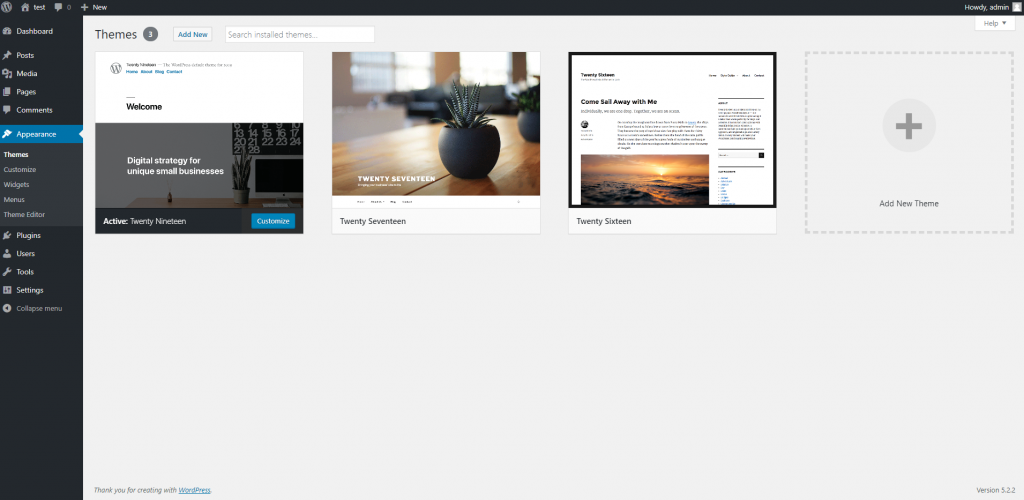
As you can see, I have three themes installed: Twenty Nineteen, Twenty seventeen and Twenty Sixteen. These are the default themes come with the latest WordPress installation.
Activate and deactivate themes
Take a look at the first theme: Twenty nineteen. You’ll notice that it has the word “Active” before the theme name. That means the theme is currently active. In fact, when you activate a theme, it will be moved to the first position of the themes list. For example, if I activate the theme Twenty Sixteen, you’ll see it at the first position.
To activate a theme, simply hover your cursor over that theme:
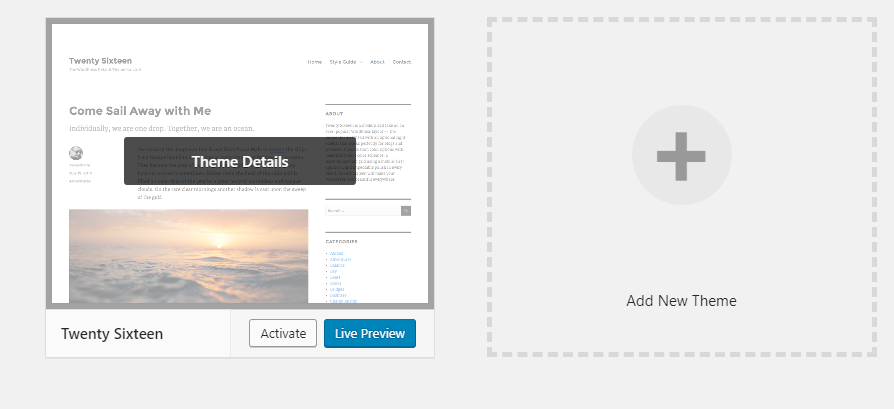
Then, click on the Activate button. You can also click on Live Preview button to see how your site look with the new theme before deciding to activate the theme or not. This feature is very helpful when you have a site running and you don’t want to constantly surprise your visitors by switching through many themes.
Activating one theme will deactivate the current active theme. There is no deactivate button. This makes sense since your website always need to have an active theme.
Installing new theme from WordPress repository
As mentioned earlier, there are thousands free themes available on WordPress.org. To add a new theme from this source, simply click on Add new button at the top of Themes screen:
Then, you’ll see next screen with full of themes:
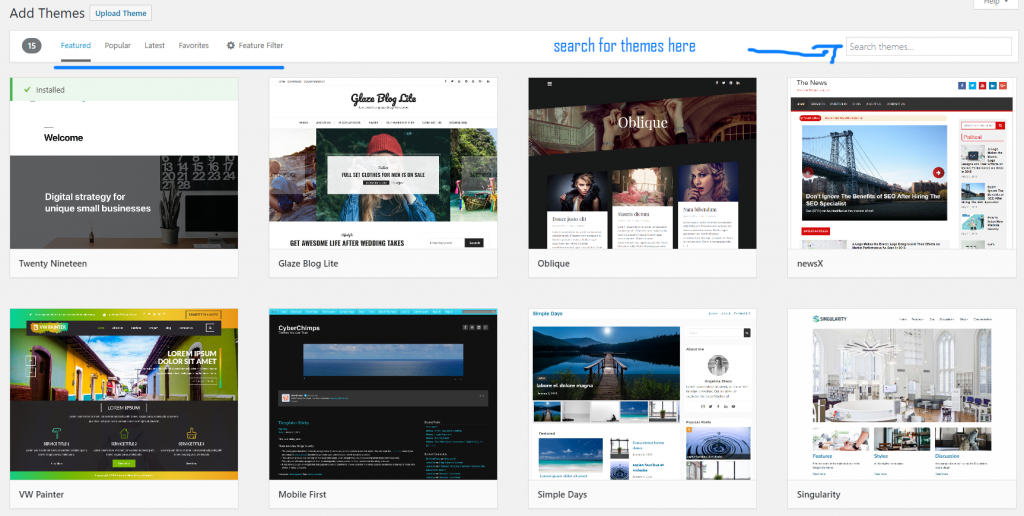
As you can see from the part that I underlined with a blue bar, there are options to filter the themes. You can browse featured, popular, latest… themes with just one click. If you know the name of the theme or a feature (one column, light weight…), you can enter the search phrase into the search box to search for the themes.
To install a theme, simply hover your cursor onto that theme, you’ll see the Install button appears:
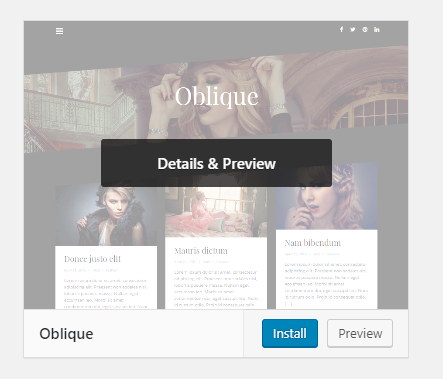
If you click on install, WordPress will go ahead and download and install the theme. After the installation is done, the theme will be available in your list of installed theme (You can click on Appearance -> Themes again to see the list of installed themes).
Install new theme from a .zip file
In many cases, free themes don’t have the features you are looking for. It’s time to purchase a premium theme. After purchasing the themes, you will be given a .zip file. Then, you need to upload that .zip file to your site to start using the theme.
To install a theme from a zip file, simply click on Appearance->Themes->Add new:
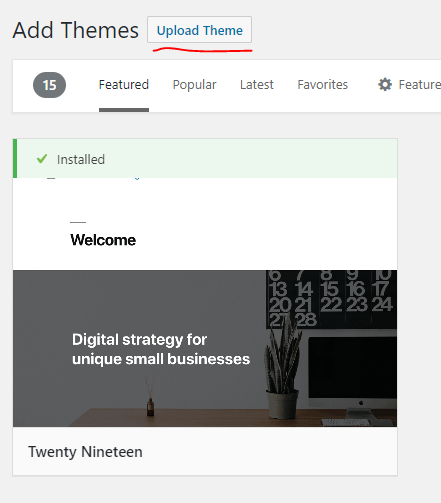
Click on Upload Theme button, you’ll see a new section where you can upload the zip file:
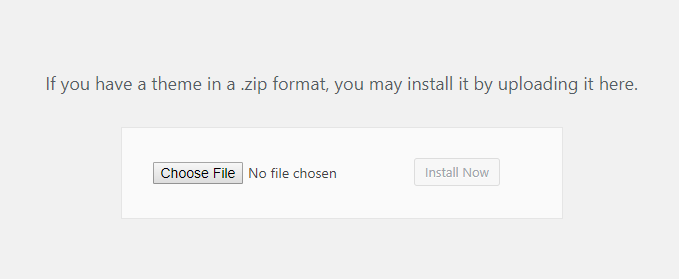
Now, click on Choose file, you’ll see a file selector window appear. Let’s navigate to the zip file on your computer and select it to start uploading:
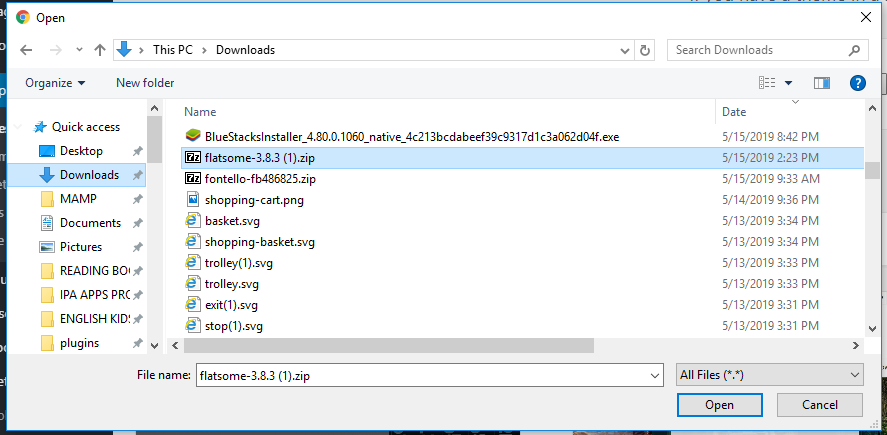
In the screenshot, I select the famous Flatsome theme (one of the most popular theme for WordPress sites that run as a shop). With the file selected, click on Open.
Notice that I’m using Windows. If you use Mac or Linux, you will see a slightly different interface when selecting the zip file. However, I believe that you have no trouble selecting files for upload in those platforms.
After selecting the zip file, I’ll click on Install now to start uploading and installing the theme.
Depending on the size of your theme, the process may take from a few seconds to about a minute.
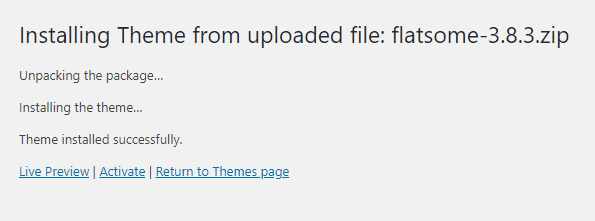
If there is no problem with the upload and install process, you’ll see the the screen above. You can preview the theme by clicking on Live Preview or click on Activate to activate the theme right away.
Add additional functionalities with plugins
Now you know how to work with themes, working with plugins is much easier. Adding, removing plugins are similar to what of themes. Similar to themes, there is a free repository of plugins on WordPress.org.
What are plugins?
Plugins are software that add new functions to your WordPress site. They may modify a default function of WordPress. Earlier in this post, I mentioned that you can disable Gutenberg editor and enable the classic editor using a plugin. That is an example of how plugins work in WordPress.
Plugins are powerful. Later, you will find out about WooCommerce. It is a plugin that turns your site into an ecommerce store. WooCommerce is the most popular e-commerce solution on the internet today.
States of a WordPress plugin
A plugin installed on your site has two states:
- Activated
- Deactivated
Only when activated, the functions of the plugin can take effect. If one plugin is deactivated, it has no effect on your site.
Manage plugins on your site
To manage plugins on your site, simply go to Plugins->Installed plugins on the left menu of your dashboard:
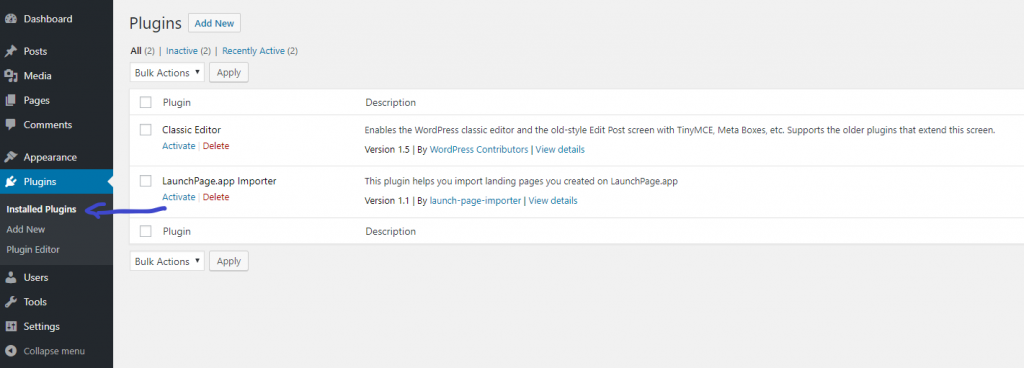
Then you’ll see the list of installed plugin on your site. In the screenshot, you can see that I have two plugins called “Classic Editor” and “LaunchPage.app Importer”. You can see that they are both deactivated (since there is a “activate” link under each plugin).
Activate & Deactivate plugins
To activate any plugin, click on the Activate link under that plugin’s name.
For example, I’m going to activate “classic Editor”.
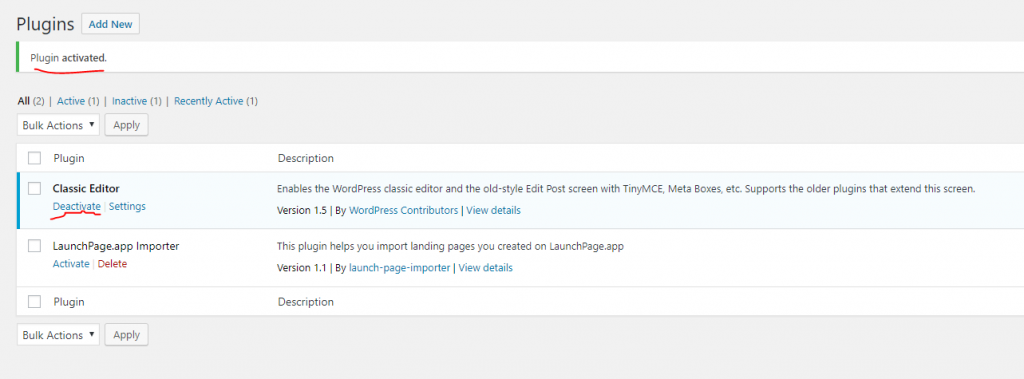
As you can see from the screenshot above, the background of “classic editor” turned to light blue. The link below it changed to “Deactivate”. Also, there is a notice at the top of the screen says: “Plugin activated”.
Now, if you want to deactivate any plugin, simply click on “Deactivate link” under that plugin.
Delete a plugin
You can only delete a plugin when it is deactivated. From the screenshot above, you can see that under “Launchpage.app Importer”, there is a red link called “delete”. Simply click on that and confirm you want to delete the plugin to permanently wipe that plugin from your site.
Install plugins from WordPress respository
To install a new plugin from WordPress.org repository, you simply click on Plugins->Add new
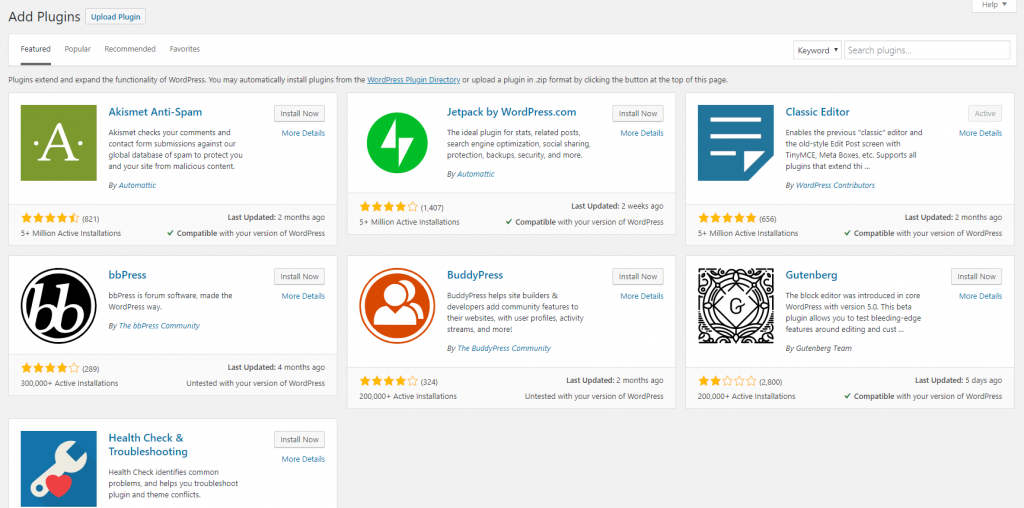
By default, you’ll see the list of featured plugin. Similar to add theme screen, you can switch to Popular, recommended tabs to see other sets of plugins. If you connect your site to your WordPress.org account, (a free account that let you participate in WordPress.org forum and review plugins, themes) you can see your favorite plugins in the Favorites tab.
You can also search for plugins using the search box.
As you might notice, there is a “Install now” button at the right of every plugin. If you want to install a particular plugin, click on that button. WordPress will start to download and install that plugin for you.
The button’s status will change to “Installing”
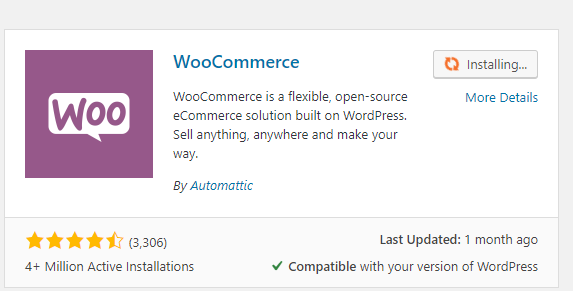
When the installation is done, that button will change to Activate.
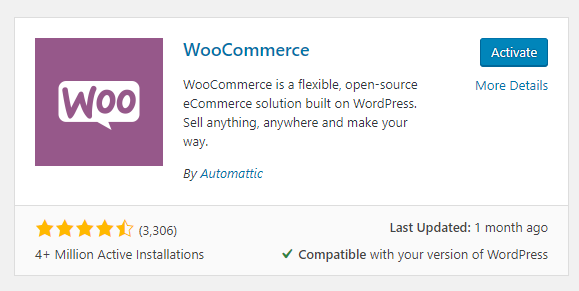
You can click on the Activate button to activate the plugin.
Manage access to your site with user management
What are users?
Simply put, users are the ones that have access to the admin panel. To login to the admin panel, all users need to enter their username/email and their password.
What are user roles?
Not all users in WordPress are equal. Users are differentiated by their roles. The role of a user determines what he can and cannot do on the site. By default, WordPress has the following roles:
- Subscriber
- Contributor
- Author
- Editor
- Administrator
The subscriber has least power while the administrator has the most power.
How to add new users
To add a new user, you must be an administrator. By default, when you first create your site, you are give an account with administrator role.
Now, click on Users->Add new to add a new user:
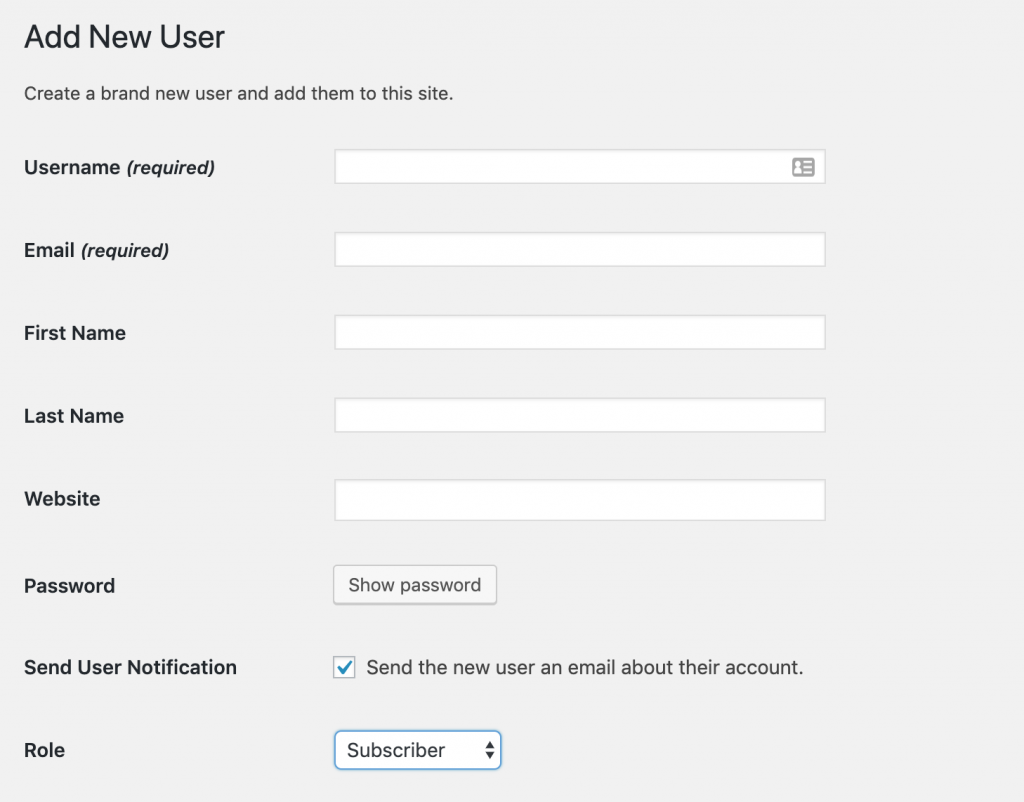
You can see that there are a few fields that required. You must give the new user a user name (no space, no special characters) and an email. If you create an account for someone, make sure you enter the email correctly since the password creation link will be sent to that email.
You can also create a password for that user (by clicking on Show password button) to set the password yourself.
Finally, make sure you select the right role. Be very careful when you create Editor or Administrator account since these accounts can do much damage to your site (since they have much power) if the one who own those accounts are malicious or not careful.
To create the account, click on create account button at the bottom.
How to remove users
To remove a user, you also need to be an Administrator. Now, go to Users->all users to see the list of users on your site:
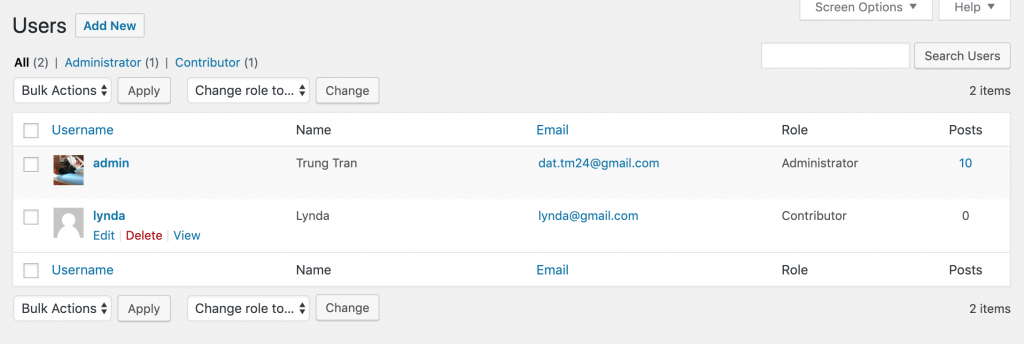
Now if you hover your cursor on the user, you’ll see the Delete link appears with the red color. To delete any account, click on the Delete link right below it. You’ll see this screen appears:
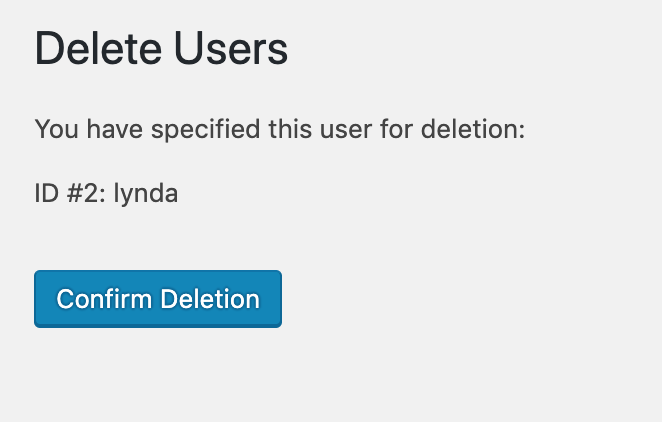
Click on the button “Confirm Deletion” to delete the user. If you go back, the user is not deleted.
Configure your site settings for SEO
To write about WordPress SEO, I may need to write a complete book. However, with some basic initial adjustments, you can setup your site for SEO success.
Setting up the site title correctly
If you are serious about your site (I know you are), setting up the site title correctly is very important. Site title is usually short and have little SEO effect. However, it reflects your website, your brand. Later, people may search for your site to get to your content. So, choosing your site title is very important.
To set your site title, you go to Settings->General
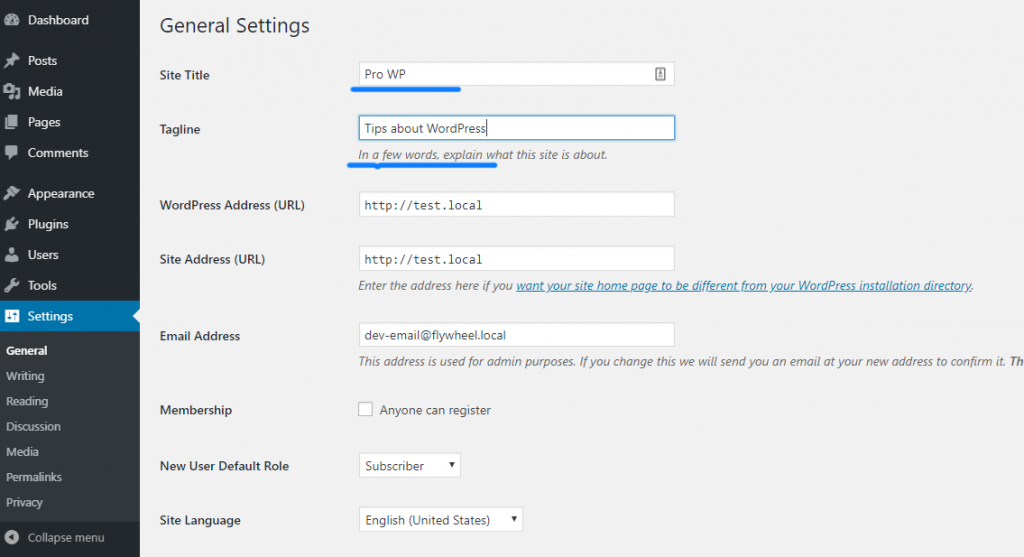
Here, you can change the site title and the tag line in the boxes that I underlined with blue color.
After entering the title, make sure you scroll to the bottom of the page to click on Save changes to store your change to the database.
Setting up SEO friendly URL with permalinks
For years, the URL has played a big part in SEO. WordPress offers extensive support for SEO friendly URLs. Click on Settings->permalinks:
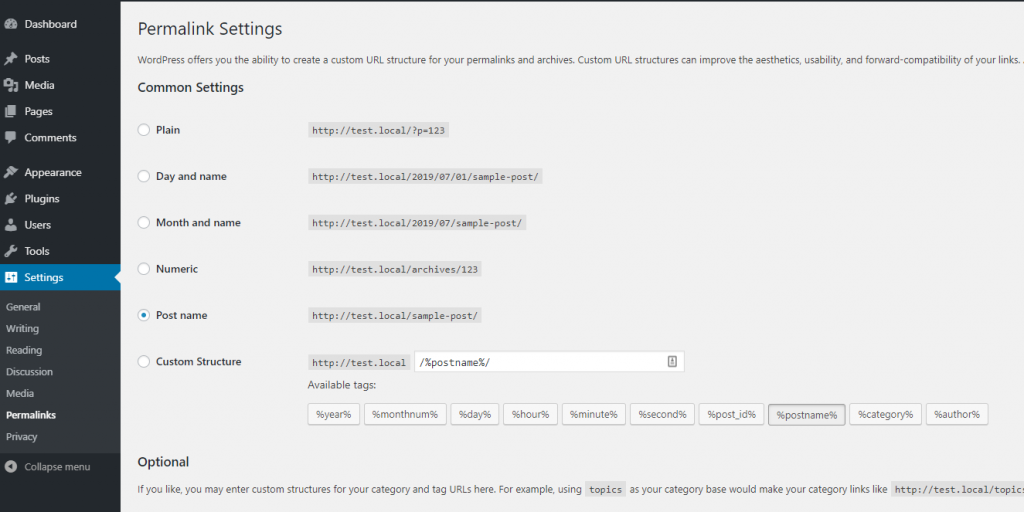
By default, you have six options for your permalink. (permalink is the structure of the URL of your pages/posts). It is recommended that you choose the URL format that when someone see it, he can tell what’s the content is about.
Take the first structure for example (Plain), you cannot tell much about the content. If someone knows WordPress, he can tell that that’s the link to a page/post that has the ID 123. However, take the structure 2,3,5 for example. The URL contains human readable text that tells exactly what the content is all about.
I usually go with the “Post name” structure to keep the URL short. However, you can choose Day and name or month and name structures if you want to include publishing date in the url
Conclusion
This is quite a long post that give you a brief introduction of WordPress. There are a lot more to learn about WordPress and I hope you’ll stick with me in this journey.
I’ll keep updating this post so make it more extensive and up to date. If you have questions, please let me know in the comment section below.
This site is built with WordPress 🙂
Click on a star to rate it!
Average rating 4.7 / 5. Vote count: 20
No votes so far! Be the first to rate this post.